Adding proxy server: transparent proxying with Bandwidth Manager and Squid
Introduction
This article tells how to install and configure Squid and Softperfect Bandwidth Manager to enable transparent proxying in a Local Area Network (LAN). Transparent proxying lets you cut usage of your Internet connection and, as the name suggests, this process is invisible to the end users. In order to implement this, you need to have a running server with Windows XP or above, a latest copy of Softperfect Bandwidth Manager and a copy of Squid Cache. Since Squid is distributed in a form of source code, the next chapter will tell you where to get a ready-to-install Windows build and how to install it.
Getting and installing Squid
The latest stable version of Squid available at the time of publication was 2.7 stable 5. You can download it from the official Squid website. Once you have downloaded Squid, unpack the ZIP file to the c:\squid folder. You may want to choose a different folder for Squid, but bear in mind that this will require you to update paths throughout the Squid configuration file. The following instructions assume that you have unpacked Squid to c:\squid.
- Go to c:\squid\etc and copy the Squid default configuration files as follows:
From To cachemgr.conf.default cachemgr.conf mime.conf.default mime.conf squid.conf.default squid.conf - Open the newly copied c:\squid\etc\squid.conf in Notepad and locate the line http_port 3128. Add the keyword transparent to make Squid understand regular HTTP request, so the line is http_port 3128 transparent.
- Before you start Squid for the first name, you must initialise its cache. Launch c:\squid\sbin\squid.exe -z to initialise the cache.
- Install Squid as a Windows service. Launch c:\squid\sbin\squid.exe -i to install it as a service.
- Attempt to start the service by typing net start squid at a command prompt. If it starts successfully, you have finished initial Squid configuration. If it does not and displays “The process terminated unexpectedly”, there is one more configuration parameter that you need to change. Open c:\squid\etc\squid.conf again and uncomment the unlinkd_program parameter. Then replace regular slashes with backslashes, i.e. change it from c:/squid/libexec/unlinkd.exe to c:\squid\libexec\unlinkd.exe. Now you should be able to start the Squid service cleanly.
Configuring Softperfect Bandwidth Manager
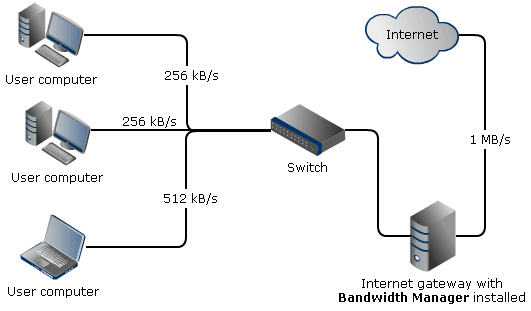
In order to setup transparent proxying, we will use the port mapping feature available in the Bandwidth Manager. This feature only works for incoming connections (i.e. requests made from client computers), so you will need to have the Bandwidth Manager installed on a server with two network cards and NAT or routing configured. In this article we assume that you have the Windows Internet Connection Sharing (ICS) enabled on this server and all the hardware is connected as shown below:

If your setup is similar to this, you can proceed with the Bandwidth Manager configuration. Choose Tools - Port Mapping from the main menu and define a mapping as shown below.
Example mapping:
Mapping name: Squid
Redirect to local port: 3128
Then define a bandwidth management rule. Set the source and destination according to your needs. In this example we redirect all HTTP traffic coming from client computers in the range 192.168.0.1 - 192.168.0.255. It is important to choose the correct network card to apply the rule on. In this example Internal refers to a network card facing the LAN clients.
Example rule:
General:
Rate limit: 100000
Protocol: TCP
Interface: Internal
Source:
Address range: 192.168.0.1 - 192.168.0.255
Port: Any
Destination:
Address: Any
Port: 80
Advanced:
Process through mapping: Squid
Now all users in the range 192.168.0.1 – 192.168.0.255 accessing web-resources via port 80 will have their requests processed by Squid. Check c:\squid\var\logs\access.log and c:\squid\var\logs\cache.log to make sure everything is working correctly. Whenever you design bandwidth management rules, bear in mind that it only makes sense to redirect HTTP requests to Squid. This is also the reason why we have set destination port to 80 to filter out all other types of traffic. Attempting to route DNS, SMTP, POP3 or any protocol other than HTTP via Squid will fail.
Further reading
- More information about Squid including FAQ and configuration guide is available at the official Squid website.
- Questions and comments are welcome at our online forum.